/en/office2003basics/open-an-existing-file/content/
Introduction
By the end of this lesson, you should be able to:
- Use Print Preview
- Use Page Setup
- Print
Print Preview
Print Preview allows you to see how your file looks before you print, preventing a waste of paper and ink.
To use Print Preview:
- Open the file you want to preview.
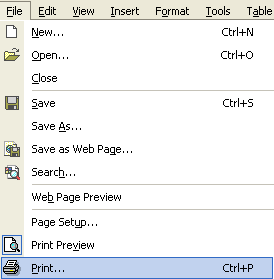
- Choose File
 Print Preview from the menu bar (Ctrl+P).
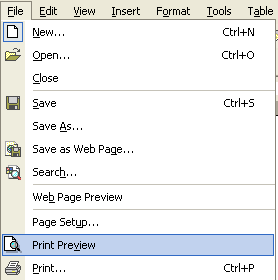
OR
- Click the Print Preview button
 on the Standard toolbar.
Once you have accessed Print Preview, your file will now be in Print Preview mode. It will look something like this:
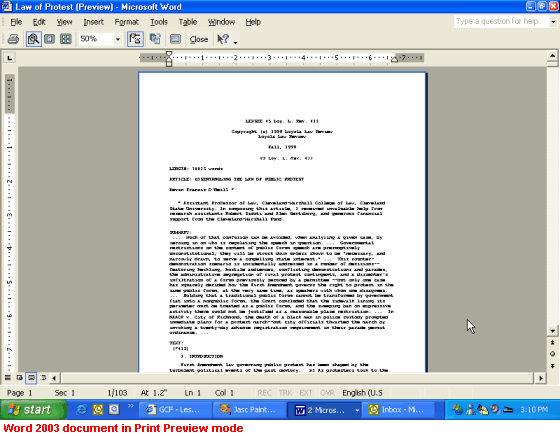
Print Preview toolbar
Print Preview mode shows you how your file is formatted. The tools available on the Print Preview toolbar help you view and edit your document before you print it.

- The Print button prints the file.
- The Magnifier button turns the mouse pointer into a small magnifying glass. When the magnifying glass has a + in the center of it, the file will enlarge when you left click. When the magnifying glass has a - in the center of it, the file will decrease in size. Click the button again to turn the magnifier off.
- The One Page button will display one page at a time.
- When you click the Multiple Pages button, a small drop-down menu will display. Highlight the number of pages you wish to display in Print Preview.
- The Zoom drop-down box lets you view your file under a specified magnification level.
- The View Ruler button will display the ruler. Click the button again to turn the ruler off.
- The Shrink to Fit button will decrease the font size of each font used in the file, preventing small amounts of text on the last page of a document. You can undo Shrink To Fit by clicking Undo Shrink To Fit on the Edit menu. Once you save the file, it's difficult to restore the document to its original font sizes.
- The Full Screen button will display your file on your entire screen. Click the button again to turn the Full Screen feature off, or click Close Full Screen on the floating Full Screen toolbar.
- The Close Preview button closes Print Preview mode, returning you to the previous view of the file.
Editing text in Print Preview
You can edit text while in Print Preview mode.
To edit text in Print Preview:
- Choose FilePrint Preview, or click the Print Preview button on the Standard toolbar.
- Click the text in the area you want to edit.
- The program zooms in on the area.
- Click the Magnifier (to turn off magnification). When the pointer becomes an I-beam, edit your file.
- To return to the original magnification, click the Magnifier, then click on the file.
- To exit print preview mode, click the Close button.
Page Setup
Before printing your files, you may want to use the Page Setup feature to define your page margins, paper size, and page orientation among other things.
To open Page Setup:
- Choose FilePage Setup from the menu bar.
- The Page Setup dialog box appears. Page Setup appears slightly differently in each of the Office programs. Word 2003's Page Setup dialog box is pictured below.
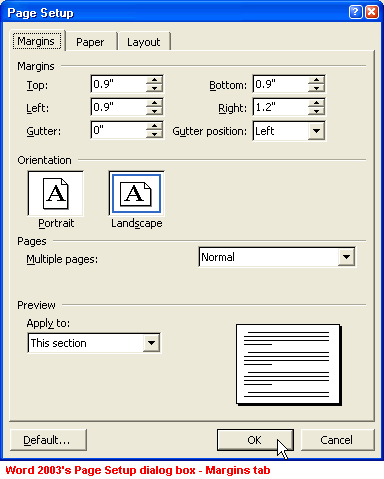
Page Setup's Margins tab
- Click the Top, Bottom, Left, or Right boxes to define the margins.
- To define page orientation, click the Portrait (prints text so the page is taller than it is wide) or Landscape (prints text so the page is wider than it is tall) option.
- Use the Multiple pages drop-down box to determine how many pages you want to print on each page and other margin options.
- Preview will show you a thumbnail view of how your document will appear when printed.
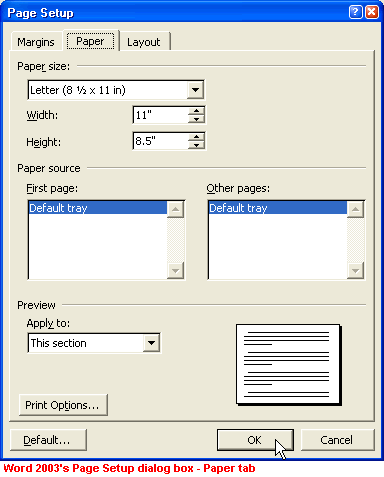
Page Setup's Paper tab
- Click the Paper tab and click the Paper Size list box to define the paper size. Use the Width and Height boxes to set a specific paper size.
- Use the Paper source section to determine what paper source you're using.
- Preview will show you a thumbnail view of how your document will appear when printed.
- The Print Options button gives you more printing options.
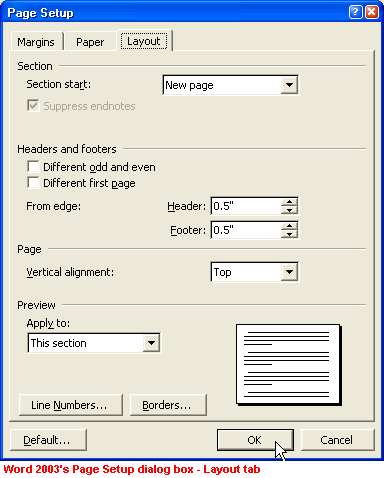
Page Setup's Layout tab
- Use Sections to vary the layout of a file within a page or between pages by inserting section breaks to divide the document into sections. Then format the section the way you wish.
- Headers and footers are in the top and bottom margins of each page in a file. You can insert text or graphics in headers and footers. Use this section to adjust header and footer layout.
- Preview will show you a thumbnail view of how your document will appear when printed.
- The Line Numbers button opens the Line Numbers dialog box, allowing you to add and position line numbering.
- The Borders button opens the Borders and Shading dialog box, allowing you to add and customize borders, page borders, and shading.
- The Default button allows you to change the default setting for Page Setup.
- Click OK when you've made necessary changes.
Troubleshooting printing problems
- Take care of the basics. Make sure the printer is plugged in, turned on, and has paper in it.
- Make sure the printer cable is properly connected to the printer and to the computer.
- Check to see if there is a paper jam. Most printers have a flashing light to indicate a jam. Also, if the paper size selected differs from the one in the paper tray, you will not be able to print. To choose a paper size, select FilePage Setup. Click the Paper Size tab.
- Check to see that the printer toner, cartridge, or ribbon is fresh and adequate. If not, printed documents may appear streaky, blotchy, or even blank.
- Make sure the printer is switched to Online mode. There is usually a button on your printer's control panel. If it is switched to Offline mode, it will not print.
- Make sure the computer knows which printer you are using. In Windows 2003, check this by clicking StartControl PanelPrinters and Other HardwareView installed printers or fax printers. If an icon for your printer doesn't appear, try restarting your computer. If you printer still doesn't appear, you may need to add it. Click Add a Printer and follow the instructions in the Add Printer Wizard.
Challenge!
- Open Word.
- Open an existing file.
- Change the page orientation.
- Preview the file using Print Preview.
- Print the file.
- Close the file, and exit Word 2003.
/en/office2003basics/selecting-text/content/


 on the Standard toolbar.